How useful would a home automation system be where you could only interact through MQTT messages? Not very, so that’s why we’ll start working on the User Interface today. The goal is to create some generic UI elements, which can be linked to the MQTT topic. The element will display the current status clearly and will let the user interact with it.
For now there will be three types of UI elements, which can be placed in a grid of tiles. These elements are:
- Button – a simple push button. The background visualizes the state and tapping it will toggle the state.
- Slider – a slider to be used for e.g. a dimmer module. The position on the slider shows the current state. Minimum and maximum values can be defined.
- Info – a tile without any interaction. Just displays the current state of for example the temperature.
Each tile can have some properties defining how it looks. Options include a title, an icon, a value and the selected state.
ps: if you’re familiar with Swift and UIKit, you might notice that – for the purpose of learning – I’m using Swift 3 and iOS 10. They are still in beta and will be available in fall.
MQTT Client
Before we can define the UI elements, we need a connection to MQTT. For this we’ll use Moscapsule, a MQTT library written in Swift. Making a connection is quite simple. We do this by creating a configuration, adding some callback blocks and opening the connection:
import Moscapsule

class MQTT {

    var mqttClient: MQTTClient?

    init() {
        let mqttConfig = MQTTConfig(
            clientId: "iOS" + UIDevice.current().identifierForVendor!.uuidString,
            host: "thuis-server-core.internal.thuisapp.com",
            port: 1883,
            keepAlive: 60
        )

        mqttConfig.onMessageCallback = { message in
            print("Message received on \(message.topic): \(message.payloadString)")
        }

        mqttConfig.onConnectCallback = { returnCode in
            print("MQTT connected")
        }

        var mqttClient = Moscapsule.MQTT.newConnection(mqttConfig)
    }
}
As you can see we don’t do anything yet in the callbacks, except for logging. We’ll arrange that later; let’s firstly create the UI elements themselves.
Tiles: data model
All types of tiles share some attributes. One of these is an array of MQTT topics to which this tile will be subscribed. The common attributes are defined in the base class Tile, including an enum for annotating topics and a protocol for making a tile selectable:
class Tile {
    let title: String
    var icon: UIImage?
    var value: String?

    let topics: [TopicType: String]

    init(title: String, icon: UIImage, topics: [TopicType: String]) { ... }
    convenience init(title: String, icon: ionicon, topics: [TopicType: String]) { ... }
}

enum TopicType {
    case status
    case set
    case icon
}

protocol Selectable {
    var isSelected: Bool { get set }
}
For each type of Tile a subclass exists. They describe any additional properties needed, plus they define what happens when a MQTT message is received. Let’s take the button as an example:
class ButtonTile: Tile, Selectable, MQTTSubscriber {
    var isSelected = false

    init(title: String, icon: UIImage, topic: String) {
        var topics = [TopicType: String]()
        topics[.status] = topic
        topics[.set] = "\(topic)/set"

        super.init(title: title, icon: icon, topics: topics)
    }

    convenience init(title: String, icon: ionicon, topic: String) {
        self.init(title: title, icon: UIImage.imageWithIonicon(icon, color: UIColor.black, iconSize: 42, imageSize: CGSize(width: 45, height: 45)), topic: topic)
    }

    func didReceiveMessage(_ message: MQTTMessage) {
        if topics.values.contains(message.topic) {
            switch (message.payloadString) {
            case .some("on"):
                isSelected = true
                break;
            case .some("off"):
                isSelected = false
                break;
            default:
                print("Received invalid message for topic '\(message.topic)': \(message.payloadString)")
            }
        }
    }
}
User Interface
The model doesn’t say anything about how the tile will look on screen, it just focusses on managing the status. So what about the UI? For that we use the TileCollectionViewCell, which is a subclass of UICollectionViewCell. It is defined using a nib-file and structured by using Stackviews:
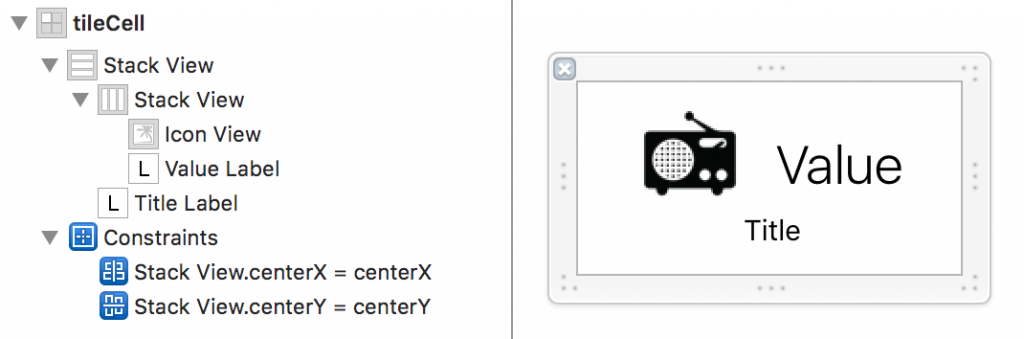
The corresponding class is a simple subclass of UICollectionViewCell which takes care of the border radius and hides the value label if there is no text defined (due to the Stackview that results in the icon being centered above the title). The heavy lifting happens in the TilesViewController, which is a UICollectionViewController. It has a property to hold a list of Tile objects. To high light a few parts: in viewDidLoad all tiles are subscribed to their respective MQTT topics:
override func viewDidLoad() {
    super.viewDidLoad()
    ...

    // Subscribe tiles to MQTT topics
    for tile in tiles where tile as? MQTTSubscriber != nil {
        for (type, topic) in tile.topics where type != .set {
            MQTT.sharedInstance.subscribe(topic, subscriber: tile as! MQTTSubscriber)
            MQTT.sharedInstance.subscribe(topic, subscriber: self)
        }
    }
}
It also subscribes itself to the same topic, so it can reload the UI when new messages are coming in:
extension TilesCollectionViewController: MQTTSubscriber {
	func didReceiveMessage(_ message: MQTTMessage) {
		DispatchQueue.main.async {
			self.collectionView!.reloadData()
		}
	}
}
The only part missing is the interaction. When you select one of the cells it will publish a message to the defined ‘set’-topic and update the internal state of the tile:
override func collectionView(_ collectionView: UICollectionView, didSelectItemAt indexPath: IndexPath) {
	let tile = tiles[indexPath.row]
	guard var selectable = tile as? Selectable else {
		return;
	}

	selectable.isSelected = !(selectable.isSelected)
	if let topic = tile.topics[.set] {
		let payloadString = selectable.isSelected ? "on" : "off"
		MQTT.sharedInstance.publish(payloadString, topic: topic, retain: false)
	}
	collectionView.reloadItems(at: [indexPath])
}
Putting it together
To put it together we create multiple instances of the TilesCollectionViewController and add them to a UITabBarController. Each instances overrides a single method defining the tiles. For the icons we use a library which enables us to use IonIcons instead of images. The home screen displays the most-used tiles:
class HomeViewController: TilesCollectionViewController {
    override func initTiles() -> [Tile] {
        return [
            InfoTile(title: "Indoor", icon: .Thermometer, topics: [.status: "Thuis/weatherIndoor/temperature", .icon: "Thuis/weatherIndoor/icon"]),
            InfoTile(title: "Weather", icon: .Thermometer, topics: [.status: "Thuis/weather/temperature", .icon: "Thuis/weather/icon"]),
            ButtonTile(title: "Home Theater", icon: .FilmMarker, topic: "Thuis/scene/homeTheater"),
            ButtonTile(title: "YouTube", icon: .SocialYoutube, topic: "Thuis/scene/youTube"),
            ButtonTile(title: "Mood", icon: .Flame, topic: "Thuis/scene/mood"),
            ButtonTile(title: "Radio", icon: .MusicNote, topic: "Thuis/scene/radio")
        ]
    }
}
This brings us the result of this blog post: a working iPhone app which communicates with Thuis through MQTT.
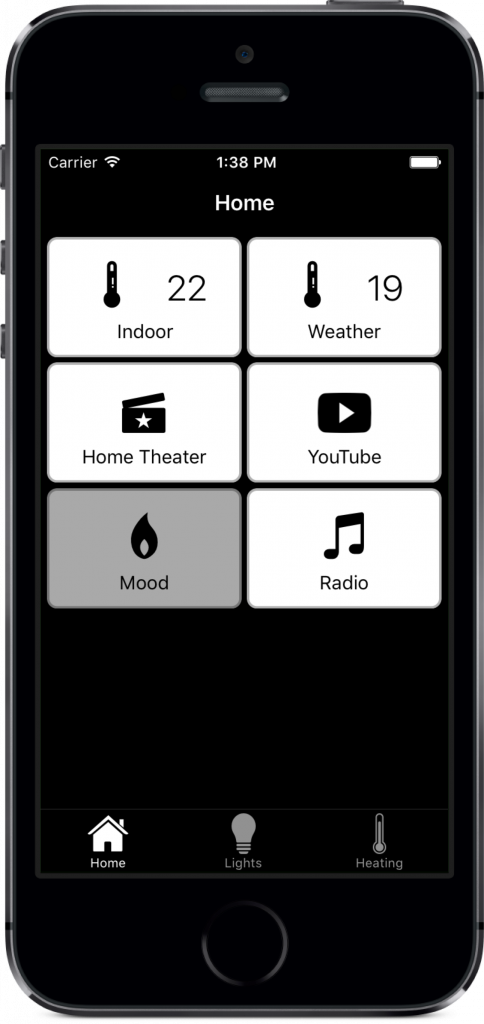
When messages arrive on the status-topics, the selected-status of the button-tiles and the value of the info-tiles are updated. When one of the button-tiles is tapped a message is send to the set-topic with the new status. As described in Publishing activity from Z-Way to MQTT this is already picked up and executed.
You probably do notice that it looks very plain yet: we’ll fix this in a next blog post. We’ll also add some more controls, like slider, which can be used for dimmers and a volume control.
Pingback:Final implementation UI design - Thuis Home Automation
Pingback:Presence monitoring using iBeacons - Thuis Home Automation
Pingback:Final demonstration Thuis - Thuis Home Automation
Some of the code windows above are cut off at the right margin.
Can you please send me the complete set by email in tar format ?
This article was exactly where Imwas looking for.
Thanks a lot.
Wim
Sorry, I missed the slidebars…… all set now.