 Plex is software which makes it possible to enjoy all of your media on all your devices. When on the server you create a library based on video (and music, photos, etc) files, Plex finds the corresponding metadata and gives you an easy to use interface to browse and play your movies. You can interact with Plex through its API and you can keep up-to-date with what’s happening on each client by subscribing to the WebSockets channel. In this last part of the Home Theater series we’ll integrate Plex in Thuis.
Plex API
Official documentation for the API is not publicly available, but luckily some other developers are maintaining the up-to-date wiki about it. For now we’ll use the API just for basic playing controls. As time is limited and the calls are simple, we’ll execute them directly from iOS:
@IBAction func playPauseAction(_ sender: AnyObject) {
    if (playing) {
        callPlex("pause")
    } else {
        callPlex("play")
    }
}
@IBAction func stopAction(_ sender: AnyObject) {
    callPlex("stop")
}
@IBAction func backAction(_ sender: AnyObject) {
    callPlex("stepBack")
}
@IBAction func forwardAction(_ sender: AnyObject) {
    callPlex("stepForward")
}

fileprivate func callPlex(_ action: String) {
    let url = URL(string: "\(clientBaseURL)/player/playback/\(action)?type=video")!
    var request = URLRequest(url: url)
    request.setValue("21DA54C6-CAAF-463B-8B2D-E894A3DFB201", forHTTPHeaderField: "X-Plex-Target-Client-Identifier")

    let task = URLSession.shared.dataTask(with: request) {data, response, error in
        print("\(response)")
    }
    task.resume()
}
As you can see there are four control @IBActions available: to play, to pause, to stop, and to scrub forward and backwards.
Nevertheless there are many more possibilities: something I am currently working on and would like to implement a bit later makes it possible for a user to select a TV series episode directly from the iOS app.
Plex Notifications
To get notifications when the play state changes one can subscribe to the WebSocket of the Plex server. The URL for the WebSockets channel is the following: ws://localhost:32400/:/websockets/notifications. There are multiple types of messages posted, but we’re only interested in PlaySessionStateNotifications. It has the following fields:
String guid;
URI key;
String ratingKey;
String sessionKey;
State state;
String transcodeSession;
String url;
long viewOffset;
The other interesting fields are state (playing, paused, etc), viewOffset (how many seconds is the video already playing) and key (identifier used to get information from the API). The code that is directly communicating with Plex is placed in a separate library. Just like for MQTT and CEC it uses CDI events to present the notifications to Thuis. In Thuis we have the PlexObserverBean handling the notifications:
package nl.edubits.thuis.server.plex;

@Startup
@ApplicationScoped
public class PlexObserverBean {
	@Inject
	private Controller controller;

	@Inject
	private LibraryService libraryService;

	@Inject
	MqttService mqttService;

	private PlaySessionStateNotification playSessionStateNotification;

	private MediaContainer mediaContainer;

	public void onPlayingNotification(@Observes @PlexNotification(Type.PLAYING) Notification notification) {
		if (!notification.getChildren().isEmpty()) {
			playSessionStateNotification = notification.getChildren().get(0);
			if (playSessionStateNotification.getState() == State.PLAYING) {
				controller.run(whenOn(Devices.kitchenMicrowave.off(), Devices.kitchenMicrowave));
				controller.run(whenOn(Devices.kitchenCounter.off(), Devices.kitchenCounter));
				controller.run(whenOn(Devices.kitchenMain.off(), Devices.kitchenMain));
			}

			mqttService.publishMessage("Thuis/homeTheater/state", playSessionStateNotification.getState().name());
			mqttService.publishMessage("Thuis/homeTheater/playing/viewOffset", playSessionStateNotification.getViewOffset() + "");

			if (playSessionStateNotification.getKey() != null) {
				if (mediaContainer != null && !mediaContainer.getVideos().isEmpty()
						&& playSessionStateNotification.getKey().equals(mediaContainer.getVideos().get(0).getKey())) {
					// No need to retrieve information
					return;
				}

				mediaContainer = libraryService.query(playSessionStateNotification.getKey());

				if (!mediaContainer.getVideos().isEmpty()) {
					Video video = mediaContainer.getVideos().get(0);
					mqttService.publishMessage("Thuis/homeTheater/playing/title", video.getTitle());
					mqttService.publishMessage("Thuis/homeTheater/playing/summary", video.getSummary());
					mqttService.publishMessage("Thuis/homeTheater/playing/art", toAbsoluteURL(video.getArt()));
					mqttService.publishMessage("Thuis/homeTheater/playing/thumb", toAbsoluteURL(video.getThumb()));
					mqttService.publishMessage("Thuis/homeTheater/playing/grandParentTitle", video.getGrandparentTitle());
					mqttService.publishMessage("Thuis/homeTheater/playing/grandParentThumb", toAbsoluteURL(video.getGrandparentThumb()));
					mqttService.publishMessage("Thuis/homeTheater/playing/duration", video.getDuration() + "");
				}
			}
		}
	}
}
When the notification has at least one child – we take the first one. If the Plex client is playing and the lights in the kitchen are still on, we are turning the lights off. Then we publish the play state and offset to MQTT. When it’s the first notification we get for the key we query the LibraryService, which calls the API to retrieve more information on the video. With all this information available through MQTT we can use it in our iOS app.
iOS
In the iOS app we will add a new view for displaying what is currently playing. When we receive a PLAYING message on Thuis/homeTheater/state we’ll automatically open it. The button to open it manually will only be available when there is something playing. For this we update our TilesCollectionViewController:
extension TilesCollectionViewController: MQTTSubscriber {
    func didReceiveMessage(_ message: MQTTMessage) {
        guard let payloadString = message.payloadString else {
            return
        }

        if (message.topic == "Thuis/homeTheater/state") {
            if (payloadString == "PLAYING" && currentState != "PLAYING") {
                openNowPlaying()
                navigationItem.rightBarButtonItem = UIBarButtonItem(title: "Now Playing", style: .plain, target: self, action: #selector(OldTilesViewController.openNowPlaying))
            }

            if (payloadString == "STOPPED" && currentState != "STOPPED") {
                self.presentedViewController?.dismiss(animated: true, completion: nil)
                navigationItem.rightBarButtonItem = nil
            }

            currentState = payloadString
        }
    }

    func openNowPlaying() {
        DispatchQueue.main.async {
            self.performSegue(withIdentifier: "nowPlaying", sender: self)
        }
    }
}
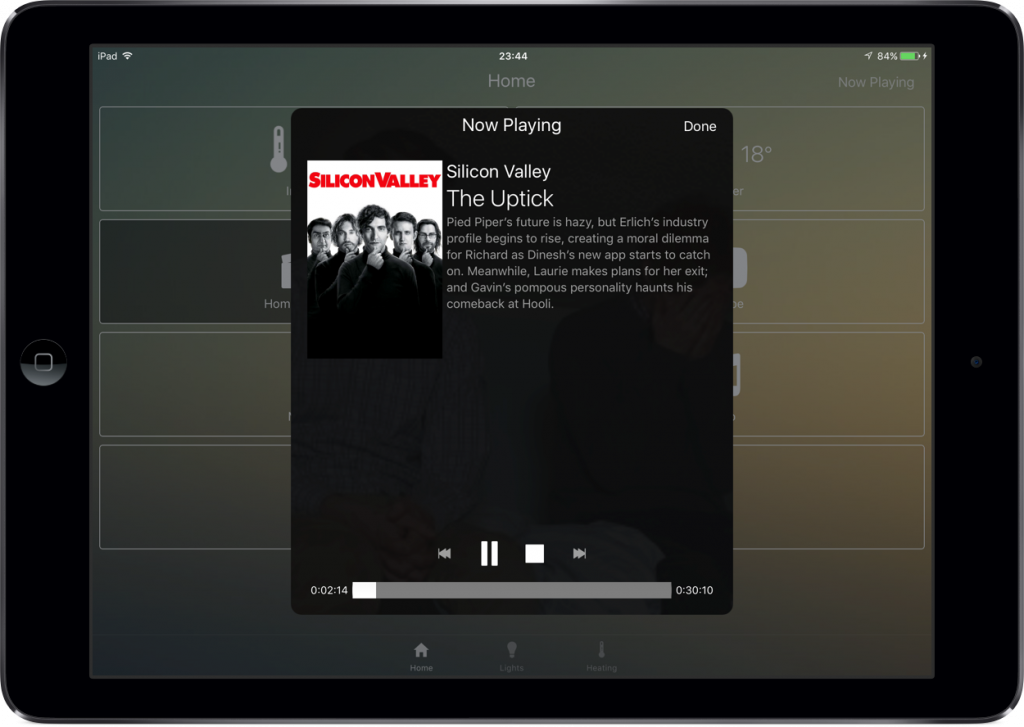
The nowPlaying view itself is composed using some StackViews, UILabels and UIImageViews. The interesting thing about them is that these default iOS UI elements themselves are MQTT subscribers and update their content based on messages on the corresponding MQTT topic. This is possible because of two features of Swift: extensions and protocols. For example the UILabel can be made aware of MQTT as follows:
extension UILabel: MQTTSubscriber {
    func setMQTTTopic(_ topic: String) {
        MQTT.sharedInstance.subscribe(topic, subscriber: self);
    }

    func didReceiveMessage(_ message: MQTTMessage) {
        if let payloadString = message.payloadString {
            DispatchQueue.main.async() {
                self.text = payloadString
            }
        }
    }
}
Similar extensions are made for the other elements. The result looks like this:
Following these steps we set up the Home Theater flow to our iOS app and made sure everything works smoothly. In my opinion it still needs a bit of fine-tuning, but even now it works pretty well!