It’s already been a few months since I wrote my last blog post about Thuis. Although the project isn’t moving as fast as it was during the challenge, it did not come to a standstill. Since then the Ambilight has been re-instated, a start was made on the kitchen UI, support for secondary buttons was added to Zway-MQTT and with some help of the community it was made more robust. And last but not least: we bought our first house: exciting times are coming up! In this blog I’ll give you a summary; I intent to write more detailed followups soon.
Ambilight
At first this seemed like an easy project as the basis was already created years ago by using an Arduino controlling the LEDs and a screen grabber installed on the connected Mac Mini. Since then I’ve switched to using an Apple TV instead and that means the grabber has to take place somewhere in between the AV receiver and TV. It was implemented using a Raspberry Pi running Hyperion and some hardware for grabbing the image (HDMI splitter, HDMI-to-RCA converter and a USB grabber). This all works pretty much out of the box, but often there was an annoying pink blink… Also every now and then the SD card got corrupt and had to be repaired. So far I’ve solved both issues and I’ll write a full blog post about it a bit later.
Kitchen UI
The Kitchen UI is still in a very early development stage. The goal is to have a specialized interface to be used while cooking. It will feature kitchen timers, controls for the kitchen lights and a recipe search. For the latter I reverse engineered the recipe API used by the Albert Heijn (supermarket in The Netherlands) app, so I can easily search for a nice recipe. By using some simple text recognition timers can be created automatically for the times mentioned in the recipe.
Zway-MQTT
My plugin for Zway aims to let it work over MQTT – Zway-MQTT – was released on their app store and is downloaded a few hundred times since. Some users even contributed to the code through its GitHub bringing improved stability, security, better support for thermostats and rolling shutters. I also worked on improving the stability and added support for using secondary buttons (aka scene activation). This will be released soon as part of version 1.3.
A new home for Thuis
One of the reasons it was so silent on this blog was that we were searching for a new home for ourselves. Now that we’ve bought a nice house, we’re busy with preparations for the move in April. This also means we have to plan how we want to move Thuis. Some functionality is quite specific for our current apartment and should work differently for our new home. For example our new house has multiple floors, so there’s a lot to think about. It’s also a good opportunity to expand Thuis even further. I’ll keep you updated!
The challenge deadline is almost there, so it’s time for a final demonstration! In this last post I’ll show you the results of my work in a video and then describe what I did and what I’m planning to improve in the future.
Let’s start with the fun part: I present you a relaxed evening at Thuis!
I’ll continue this blog in the same style as my previous Status update and will give you the latest status of all the projects and use cases.
Open Source Projects
These are the projects I made available as open source on my GitHub account during this challenge (or will make available later). They are all set up, so that they can be reused by others in their own home automation projects.
Zway-MQTT
[wp_progress_bar pc=”85″]
As described in Publishing activity from Z-Way to MQTT messages are published for each status change. It also subscribes to the responding topics, so you’re able to turn on and off devices through MQTT as well. The topics and devices used are completely configurable. With this all major functionality is done. The last couple of weeks I did several improvements to the reliability. Scene activation is something that still needs some work, so the to-do list remains the same.
To-do:
Publish a message on scene activation (e.g. used for each secondary push button on the wall)
Get it published on the Z-Way App store, already uploaded June, but still no response
Making sure I can use Chef to fully install the Raspberry Pi 3 I needed to update a few recipes and also to create a completely new one for Z-Way. This was a major hurdle and took more time than expected, but I learned a lot from it. I hope in Cooking up the nodes: Thuis Cookbook you can also find something new for yourself. In Home Theater part 1: CEC I made some small updates as I installed the node connected to the home theatre system by HDMI.
Plex doesn’t allow me to add a plugin directly in the server, but there is an API and WebSockets for status messages. The API and WebSockets are implemented, as is described in Home Theater part 3: Plex playback controls. It is mostly implemented as Java library with a similar set up as I’m using for integrating Java and MQTT. As I have to clean up the project, it will be published at a later stage.
To-do:
Publish the code on GitHub
CEC-CDI
[wp_progress_bar pc=”99″]
The library for using CEC (Consumer Electronics Control) in Java was developed about 10 months ago and performs the most common functionality: monitoring stands-status, turning on/off devices, changing volume and changing outputs. Now it’s also integrated with Thuis and is available through MQTT. For more information please visit Home Theater part 1: CEC.
Sensors are placed in both the kitchen and the entrance room. The Core knows about them and as described in Core v2: A Java EE application rules are defined to turn the lights in those rooms on and off depending on movement and time. This works pretty well already!
To-do:
Further optimize the rules
See if improvements can be made by using iBeacons
Welcome home
[wp_progress_bar pc=”100″]
The iBeacons are placed at several locations in the house, providing a good coverage to detect if you’re arriving home. When you arrive home a notification is sent, which allows you to directly start up the home theatre system.
The Z-Wave hardware for the home cinema is in place (using a 6-socket PowerNode), so it can be turned on and off. Using the above mentioned Plex and CEC integration we can fully manage the home theatre system. An extra Raspberry Pi 1B was placed next to the TV to control devices through HDMI CEC. This is described in Home Theater part 2: controls. The Ambilight will be finished at a later stage.
To-do:
Add and integrate a DIY ambilight
Mobile & On-The-Wall-UI
[wp_progress_bar pc=”100″]
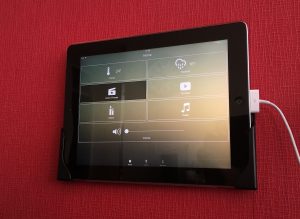
The app is running and fully functional, as you can see in Final implementation UI design, you can manage devices in the house and see the latest status. A wish is still to add a speech control to the iPad app. In the kitchen we have an iPad mounted on a cabinet as well, for which I would like to create a separate app with additional features like a cooking timer and a recipe browser (my girlfriend supports this idea a lot :). Another option is to use a Raspberry Pi plus display, which will be integrated in a cabinet door.
Todo:
Add speech commands
Create a custom app for the kitchen (either iPad or web)
Wake-up light
[wp_progress_bar pc=”10″]
Work hasn’t started yet on the Wake-up light as one of the key components (the MOVE) is not delivered. And as this is an Indiegogo project it’s still not certain when it will be delivered. I did experiment with emulating a Hue bridge to make sure Sleep Cycle can communicate with Thuis and unfortunately I could not get this working properly yet. Nevertheless, one to-do is fully fixed: the main light in the bedroom is now dimmable through Z-Wave.
To-do:
Sleep Cycle doesn’t have a web hook available yet, so it’s still needed to set up a Philips Hue bridge
Install and integrate the MOVE
Manual override
[wp_progress_bar pc=”80″]
Most lights can already be switched manually using the buttons on the walls. Some of them should however be switched using the secondary button, which does a scene activation. I still have to add support for this to the Zway-MQTT.
To-do:
Add support for secondary buttons in Zway-MQTT
Energy monitoring & saving
[wp_progress_bar pc=”10″]
For energy monitoring I only did some research. InfluxDB seems to be a good candidate for storing the data. Unfortunately I wasn’t able to work on this use case during the challenge, but I’ll come back to this in a later stage.
Todo:
Let Zway-MQTT publish energy usage
Integrate YouLess to record total energy usage of the house
Create reports based on the usage
Future
I already mentioned some future plans, a few of those I want to highlight.
Wake up light
It would be great to wake up with light that feels like a sun rise. In the summer managed by actually letting the sun in by raising the curtains, in the winter by using an electronic light. For this use case I’m currently very depended on external parties, which is the reason this part of Thuis is postponed to the later stage.
Kitchen control
Tools which are used a lot in the kitchen are a timer and a recipe browser. The plan is to integrate these both in an easy to use app which is always available on one of the kitchen cabinets doors. It can be used to override the automatic schedule as well, for example when we get home later than usual and still want the full light for cooking.
Ambilight
A few years back I’ve built an Ambilight for my TV. However this is based on an a Arduino connected to Mac Mini. It’s therefore only usable when the Mac Mini is the source of the video. As we’re mainly using a Apple TV nowadays, the Ambilight can’t be used. I will use a HDMI splitter and grabber connected to a Raspberry Pi 2B to replace the Mac Mini and make it possible to enable Ambilight for videos from all sources.
Various
Using presence information for improved automation
Saving usage data and energy usage to a database for data mining
Integrate a robotic vacuum cleaner
Add voice control
Summary
It feels so weird, but with this paragraph my last blog of this challenge comes to an end. Over the last couple of months I’ve been able to set up a very nice home automation system at my house. It was a hard job to get everything done on time and especially describe all of it in writing, but I’ve managed well and I’ve enjoyed the process a lot! Thanks again to element14 for selecting me as a sponsored challenge and for giving me the inspiration and motivation to work on Thuis!
Plex is software which makes it possible to enjoy all of your media on all your devices. When on the server you create a library based on video (and music, photos, etc) files, Plex finds the corresponding metadata and gives you an easy to use interface to browse and play your movies. You can interact with Plex through its API and you can keep up-to-date with what’s happening on each client by subscribing to the WebSockets channel. In this last part of the Home Theater series we’ll integrate Plex in Thuis.
Plex API
Official documentation for the API is not publicly available, but luckily some other developers are maintaining the up-to-date wiki about it. For now we’ll use the API just for basic playing controls. As time is limited and the calls are simple, we’ll execute them directly from iOS:
As you can see there are four control @IBActions available: to play, to pause, to stop, and to scrub forward and backwards.
Nevertheless there are many more possibilities: something I am currently working on and would like to implement a bit later makes it possible for a user to select a TV series episode directly from the iOS app.
Plex Notifications
To get notifications when the play state changes one can subscribe to the WebSocket of the Plex server. The URL for the WebSockets channel is the following: ws://localhost:32400/:/websockets/notifications. There are multiple types of messages posted, but we’re only interested in PlaySessionStateNotifications. It has the following fields:
String guid;
URI key;
String ratingKey;
String sessionKey;
State state;
String transcodeSession;
String url;
long viewOffset;
The other interesting fields are state (playing, paused, etc), viewOffset (how many seconds is the video already playing) and key (identifier used to get information from the API). The code that is directly communicating with Plex is placed in a separate library. Just like for MQTT and CEC it uses CDI events to present the notifications to Thuis. In Thuis we have the PlexObserverBean handling the notifications:
package nl.edubits.thuis.server.plex;

@Startup
@ApplicationScoped
public class PlexObserverBean {
	@Inject
	private Controller controller;

	@Inject
	private LibraryService libraryService;

	@Inject
	MqttService mqttService;

	private PlaySessionStateNotification playSessionStateNotification;

	private MediaContainer mediaContainer;

	public void onPlayingNotification(@Observes @PlexNotification(Type.PLAYING) Notification notification) {
		if (!notification.getChildren().isEmpty()) {
			playSessionStateNotification = notification.getChildren().get(0);
			if (playSessionStateNotification.getState() == State.PLAYING) {
				controller.run(whenOn(Devices.kitchenMicrowave.off(), Devices.kitchenMicrowave));
				controller.run(whenOn(Devices.kitchenCounter.off(), Devices.kitchenCounter));
				controller.run(whenOn(Devices.kitchenMain.off(), Devices.kitchenMain));
			}

			mqttService.publishMessage("Thuis/homeTheater/state", playSessionStateNotification.getState().name());
			mqttService.publishMessage("Thuis/homeTheater/playing/viewOffset", playSessionStateNotification.getViewOffset() + "");

			if (playSessionStateNotification.getKey() != null) {
				if (mediaContainer != null && !mediaContainer.getVideos().isEmpty()
						&& playSessionStateNotification.getKey().equals(mediaContainer.getVideos().get(0).getKey())) {
					// No need to retrieve information
					return;
				}

				mediaContainer = libraryService.query(playSessionStateNotification.getKey());

				if (!mediaContainer.getVideos().isEmpty()) {
					Video video = mediaContainer.getVideos().get(0);
					mqttService.publishMessage("Thuis/homeTheater/playing/title", video.getTitle());
					mqttService.publishMessage("Thuis/homeTheater/playing/summary", video.getSummary());
					mqttService.publishMessage("Thuis/homeTheater/playing/art", toAbsoluteURL(video.getArt()));
					mqttService.publishMessage("Thuis/homeTheater/playing/thumb", toAbsoluteURL(video.getThumb()));
					mqttService.publishMessage("Thuis/homeTheater/playing/grandParentTitle", video.getGrandparentTitle());
					mqttService.publishMessage("Thuis/homeTheater/playing/grandParentThumb", toAbsoluteURL(video.getGrandparentThumb()));
					mqttService.publishMessage("Thuis/homeTheater/playing/duration", video.getDuration() + "");
				}
			}
		}
	}
}
When the notification has at least one child – we take the first one. If the Plex client is playing and the lights in the kitchen are still on, we are turning the lights off. Then we publish the play state and offset to MQTT. When it’s the first notification we get for the key we query the LibraryService, which calls the API to retrieve more information on the video. With all this information available through MQTT we can use it in our iOS app.
iOS
In the iOS app we will add a new view for displaying what is currently playing. When we receive a PLAYING message on Thuis/homeTheater/state we’ll automatically open it. The button to open it manually will only be available when there is something playing. For this we update our TilesCollectionViewController:
The nowPlaying view itself is composed using some StackViews, UILabels and UIImageViews. The interesting thing about them is that these default iOS UI elements themselves are MQTT subscribers and update their content based on messages on the corresponding MQTT topic. This is possible because of two features of Swift: extensions and protocols. For example the UILabel can be made aware of MQTT as follows:
Similar extensions are made for the other elements. The result looks like this:
Following these steps we set up the Home Theater flow to our iOS app and made sure everything works smoothly. In my opinion it still needs a bit of fine-tuning, but even now it works pretty well!
In Final implementation UI design you saw our Thuis iOS app, which has a few buttons for controlling the Home Theater. In this post we’ll make sure they work well. For brevity I will describe only the main scene: it makes sure we can watch anything on the Apple TV.
Defining devices
Before we can use any devices in Thuis we have to define them. You might remember from Core v2: A Java EE application that we have a class Devices containing static definitions. Here we will add the devices we need for the home theater system:
package nl.edubits.thuis.server.devices;

public class Devices {
	public static Computer NAS = new Computer(none, "nas", "nas.local", "admin", "00:22:3F:AA:26:65");
	public static AppleTV appleTv = new AppleTV(livingRoomHomeTheater, "appleTv", "10.0.0.30");
	public static HomeTheater homeTheater = new HomeTheater(livingRoomHomeTheater, "homeTheater");
	public static MqttSwitch tv = new MqttSwitch(livingRoomHomeTheater, "tv");
	public static Receiver denon = new Receiver(livingRoomHomeTheater, "denon", "10.0.0.8");
	public static MqttSwitch homeTheaterTv = new MqttSwitch(livingRoomHomeTheater, "tvSwitch");
	public static MqttSwitch homeTheaterDenon = new MqttSwitch(livingRoomHomeTheater, "denonSwitch");
}
The bottom 2 are Z-Wave outlets, which you’ve seen before. All the others are new types of devices. Below we’ll describe each of them separately.
TV
Let’s start with the easiest device: the television. With the work we did yesterday in Home Theater part 1: CEC we can turn the TV on and off by sending a simple MQTT message. Because of that it’s defined as a MqttSwitch.
Apple TV
The Apple TV is a great device as the centre of the home theatre. It is able to control other devices through CEC, but unfortunately you can’t control it yourself through CEC. So I had to look for an alternative and I found it in AirPlay. Xyrion describes it well how you can wake up an Apple TV by connecting to it using Telnet and telling it to play some bogus video.
In Java we can do this by using a Socket. For this we’ll create a new Command, the SocketCommand:
package nl.edubits.thuis.server.automation.commands;

public class SocketCommand implements Command {
	String hostname;
	int port;
	String body;

	public SocketCommand(String hostname, int port, String body) {
		// ...
	}

	@Override
	public Message runSingle() {
		try (
				Socket socket = new Socket(hostname, 7000);
				PrintWriter out = new PrintWriter(socket.getOutputStream(), true);
				BufferedReader in = new BufferedReader(new InputStreamReader(socket.getInputStream()));
		) {
			out.print(body);
			out.flush();

			logger.info("Socket response: " + in.readLine());
		} catch (IOException e) {
			logger.log(Level.WARNING, "Socket failed", e);
		}

		return null;
	}
}
We use this command in the definition of the AppleTV itself. By extending MqttSwitch we can leverage the logic for updating its status from MQTT. I’m not entirely sure how we can turn off the Apple TV programmatically, so this method is not implemented yet.
package nl.edubits.thuis.server.devices;

public class AppleTV extends MqttSwitch implements Switch {
	String hostname;

	public AppleTV(Room room, String id, String hostname) {
		// ...
	}

	@Override
	public Command on() {
		return new SocketCommand(hostname, 7000, "POST /play HTTP/1.1\n" +
				"Content-Length: 65\n" +
				"User-Agent: MediaControl/1.0\n" +
				"\n" +
				"Content-Location: http://example.org/test.mp4\n" +
				"Start-Position: 0\n" +
				"\n");
	}

	@Override
	public Command off() {
		// TODO
	}
}
Receiver
My AV receiver is Denon AVR-X2000. CEC support on this device is limited, but luckily there is an API. Unfortunately, the API is not documented, but by using the web interface I could reverse engineer it. While it’s starting up there are some quirks though as it can take quite a while before the Denon is reachable through the API (while it already works by manually pressing the power button). Because of this we’ll use a combination of both CEC and the API.
Firstly lets create the Receiver class itself. It’s a implementation of MqttSwitch, so the CEC part is easily taken care of. We do override the on() method to make sure it’s only fired when needed as this command toggles the power status for the Denon. To get more detailed information on the status and to change volume and inputs we use the API. The API calls are performed by a DenonCommand.
package nl.edubits.thuis.server.devices;

public class Receiver extends MqttSwitch implements Device, Switch, Singable {
	private final String hostname;
	private Status status;
	private NowPlaying nowPlaying;

	public Receiver(Room room, String id, String hostname) {
		// ...
	}

	public boolean isFullyOn() {
		return isOn() && (status == null || status.getZonePower());
	}

	public boolean isFullyOff() {
		return !isOn() && (status == null || !status.getZonePower());
	}

	@Override
	public Command on() {
		if (!isOn()) {
			return super.on();
		}
		return null;
	}

	public DenonCommand volume(double value) {
		value = Math.max(0, Math.min(98, value));
		String volume = (value==0) ? "--" : String.format("%.1f", value-80);
		return new DenonCommand(this, "PutMasterVolumeSet", volume);
	}

	public DenonCommand input(Input input) {
		return new DenonCommand(this, "PutZone_InputFunction", input.getValue());
	}
}
Due to the time limitations I won’t go into the implementation of the API in this post. If you would like to find out more details about this topic, there is a valuable article by Open Remote describing the key possibilities.
NAS
The NAS runs the Plex Media Server. When nobody is home, the NAS is not used and is turned off by default. The NAS supports Wake-on-LAN (WOL), so we can use this to awake it to make Plex available.
For WOL I use a nice little library and built a command around it:
package nl.edubits.thuis.server.automation.commands;

public class WakeOnLanCommand implements Command {
	Computer computer;

	public WakeOnLanCommand(Computer computer) {
		// ...
	}

	@Override
	public Message runSingle() {
		try {
			for (int i = 0; i < 5; i++) {
				WakeOnLan.wake(computer.getMAC());
			}
			return new Message(String.format("Thuis/computer/%s", computer.getId()), "wake");
		} catch (IOException | DecoderException e) {
			logger.log(Level.WARNING, String.format("Waking up '%s' failed", computer.getId()), e);
		}
		return null;
	}
}
As the Computer class used for the NAS is just a basic implementation of an Actuator using the WakeOnLanCommand for the wake() method, I would not present the source code here.
Scenes
Now when we almost have all the devices set up we can combine them in scenes. Let’s start with some code:
public static Scene homeTheaterBase = new Scene("homeTheaterBase",
	asList(
		highPriority(homeTheaterDenon.on()),
		waitForOn(denon.on(), homeTheaterDenon)
	),
	asList(
		denon.off(),
		waitForFullyOff(homeTheaterDenon.off(), denon)
	)
);

public static Scene homeTheater = new Scene("homeTheater",
	asList(
		highPriority(NAS.wake()),
		homeTheaterTv.on(),
		illuminanceIsLowerOrEqual(livingMoodTop.on(), 70l),
		waitForOn(Devices.tv.on(), homeTheaterTv),
		waitForOn(appleTv.on(), denon),
		waitForOn(Devices.tv.on(), appleTv),
		waitForFullyOn(new ListCommand(asList(
			denon.input(Input.TV),
			denon.volume(50)
		)), denon)
	),
	asList(
		Devices.tv.off(),
		livingMoodTop.off(),
		waitForOff(homeTheaterTv.off(), Devices.tv)
	)
);
Here the scenes are split in two. The homeTheaterBase is the basis for all different home theater scenes: e.g. the one for the Apple TV is displayed here, or the one for Blu-ray. It also allows me to switch from one to another without turning everything off.
As you can see lots of commands are dependent on each other, so devices have to wait for some other devices before starting up. The most obvious case is that you first have to turn on the power before you can turn on the device itself, or give the device more commands.
The receiver has a special qualifier waitForFullOn: this is because it has two stages of powering on. Firstly CEC reports it’s turned on (this is the normal on-state) and later the API reports the powered-on status as well (the full-on-state). We’re interested in both of them as it’s not possible to send any commands through the API before it reaches the fully-on-state.
Time for a quick demo:
Note: as this is the demo, the launch takes a bit of more time then usually. Please be patient 🙂
There is one thing left to integrate: Plex! This will be the subject of part 3.
An important part of Thuis is integration of our Home Theater system. As the integration is quite extensive and consists of several components, this will be a 3-part blog series. In the first part we start with communicating to CEC-enabled devices from a Raspberry Pi. In the second part we will integrate CEC with the rest of Thuis, and make sure everything works properly together. In the third – and last – part of the Home Theater series we will add the support for Plex.
CEC
Let’s start with a short introduction of CEC itself. CEC stands for Consumer Electronics Control and is a feature of HDMI. CEC enables HDMI-devices to communicate with each other. In the ideal situation this means a user only needs one remote control to control all his devices: TV, AV receiver, Blu-ray player, etc. Unfortunately many manufacturers use their own variation of CEC and therefore in a lot of cases one still needs multiple remotes. To get an idea about the protocol have a look a CEC-O-MATIC, this is a great reference for all available commands!
The good news is that the GPU of the Raspberry Pi supports CEC out of the box!
libCEC
To be able to handle the different dialects of CEC, Pulse Eight developed libcec. It enables you to interact with other HDMI devices without having to worry about the communication overhead, handshaking and all the differences between manufacturers. In contrast to what I mentioned in Cooking up the nodes: Thuis Cookbook Raspbian Jessie nowadays provides version 3.0.1 in the Apt repository, so there is no need to use the version from Stretch anymore. I’ve updated the cookbook accordingly. Other than that provisioning the Raspberry Pi using Chef was straightforward.
libCEC comes with the tool cec-client. This basically gives you a terminal for CEC commands. When we execute cec-client you see it connecting to HDMI and collecting some information about other devices, then we can give it commands. For example we ask it for all devices currently connected with the scan command:
thuis-server-tv# cec-client -d 16 -t r
log level set to 16
== using device type 'recording device'
CEC Parser created - libCEC version 3.0.1
no serial port given. trying autodetect:
 path:     Raspberry Pi
 com port: RPI

opening a connection to the CEC adapter...
DEBUG:   [              94]	Broadcast (F): osd name set to 'Broadcast'
DEBUG:   [              96]	InitHostCEC - vchiq_initialise succeeded
DEBUG:   [              98]	InitHostCEC - vchi_initialise succeeded
DEBUG:   [              99]	InitHostCEC - vchi_connect succeeded
DEBUG:   [             100]	logical address changed to Free use (e)
DEBUG:   [             102]	Open - vc_cec initialised
DEBUG:   [             105]	<< Broadcast (F) -> TV (0): POLL
// Receiving information from the TV
// ...
// Request information about all connected devices
scan
requesting CEC bus information ...
DEBUG:   [           41440]	<< Recorder 1 (1) -> Playback 1 (4): POLL
DEBUG:   [           41472]	>> POLL sent
DEBUG:   [           41473]	Playback 1 (4): device status changed into 'present'
// ...
CEC bus information
===================
device #0: TV
address:       0.0.0.0
active source: no
vendor:        Sony
osd string:    TV
CEC version:   1.4
power status:  on
language:      dut


device #1: Recorder 1
address:       1.6.0.0
active source: no
vendor:        Pulse Eight
osd string:    CECTester
CEC version:   1.4
power status:  on
language:      eng


device #4: Playback 1
address:       1.1.0.0
active source: yes
vendor:        Unknown
osd string:    Apple TV
CEC version:   1.4
power status:  on
language:      ???


device #5: Audio
address:       1.0.0.0
active source: no
vendor:        Denon
osd string:    AVR-X2000
CEC version:   1.4
power status:  on
language:      ???


currently active source: Playback 1 (4)
// indicates a comment added by me, // ... indicates output that was hidden as it’s not needed for understanding
As you can see currently 4 devices are connected to the bus, including the Raspberry Pi itself (device #1). The Apple TV is the currently active source. You can tell cec-client which output it should give with the -d parameter. We’ll use this for our integration by choosing -d 8, which just displays the traffic on the bus.
CEC-CDI
To integrate libCEC (or more specifically cec-client) with Java we have to write a wrapper around it. We’ll do that in a similar way as MQTT-CDI, so the Java code can observe events happening on the CEC-bus via a CDI observer. I wrote the initial version about a year ago and the full source code is available on my GitHub as Edubits/cec-cdi. It does not support the full CEC protocol yet, but most of the usual commands are available. For example you’re able to turn on and off your devices, and send UI commands like play, pause, volume up, etc. You can of course also monitor these same functions, so the app will for example know when you turn off the TV manually.
You can add CEC-CDI to your own project by adding the following dependency to your pom.xml:
Monitoring what happens in the home theatre system can be done using CDI observers. Currently you can just add a qualifier for the source device, later I might also add some more sophisticated qualifiers such as the type of a command. When you’re interesting in all messages send from the TV you can observe them like this:
@ApplicationScoped
public class CecObserverBean {
    public void tvMessage(@Observes @CecSource(TV) Message message) {
        logger.info("Message received from TV: " + message);
    }
}
To turn the TV on you can send it the IMAGE_VIEW_ON message without any arguments, for putting it in standby you use the STANDBY command. In Java this looks as follows:
public class SendExample {
    @Inject
    private CecConnection connection;

    public void send() {
        // Send message from RECORDER1 (by default the device running this code) to the TV to turn on
        connection.sendMessage(new Message(RECORDER1, TV, IMAGE_VIEW_ON, Collections.emptyList(), ""));

        // Send message from RECORDER1 (by default the device running this code) to the TV to turn off
        connection.sendMessage(new Message(RECORDER1, TV, STANDBY, Collections.emptyList(), ""));
    }
}
ThuisServer-TV
Just like the Core application described in Core v2: A Java EE application, this will be a Java EE application running on WildFly. It includes CEC-CDI. The application itself is quite simple as it’s only function is bridging between CEC and MQTT. So we have two @ApplicationScoped beans observing events.
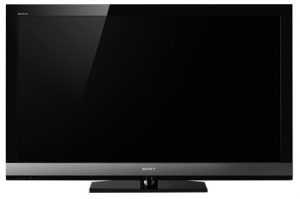
The CecObserverBean forwards specific messages from the CEC bus to MQTT. In the example it monitors the power state of the television. Note that my Sony television has its own dialect as well, depending on how the TV is turned off it reports the official STANDBY command or gives a vendor specific command. When turning on it’s supposed to report a certain command as well, but the Sony decides to skip it. That’s why – as workaround – I listen to REPORT_PHYSICAL_ADDRESS, which is a command it always gives during power on.
package nl.edubits.thuis.server.tv.cec;

@Startup
@ApplicationScoped
public class CecObserverBean {
	@Inject
	MqttService mqttService;

	public void tvMessage(@Observes @CecSource(TV) Message message) {
		if (message.getDestination() != BROADCAST && message.getDestination() != RECORDER1) {
			return;
		}

		switch (message.getOperator()) {
		case STANDBY:
			mqttService.publishMessage("Thuis/device/living/homeTheater/tv", "off");
			break;

		case REPORT_PHYSICAL_ADDRESS:
			mqttService.publishMessage("Thuis/device/living/homeTheater/tv", "on");
			break;

		case VENDOR_COMMAND_WITH_ID:
			if (message.getRawMessage().equals("0f:a0:08:00:46:00:09:00:01")
					|| message.getRawMessage().equals("0f:87:08:00:46")) {
				mqttService.publishMessage("Thuis/device/living/homeTheater/tv", "off");
			}
			break;

		default:
			break;
		}
	}
}
The opposite happens in the MqttObserverBean, which listens to MQTT messages and executes the corresponding CEC commands. Here we’ll turn the TV on and off and then ask the TV to report its power status back:
package nl.edubits.thuis.server.tv.mqtt;

@ApplicationScoped
public class MqttObserverBean {
	@Inject
	private CecConnection connection;

	public void onActionMessageTV(@Observes @MqttTopic("Thuis/device/living/homeTheater/tv/set") MqttMessage message) {
		switch(message.asText()) {
			case "on":
				connection.sendMessage(new Message(RECORDER1, TV, IMAGE_VIEW_ON, Collections.emptyList(), ""));
			case "off":
				connection.sendMessage(new Message(RECORDER1, TV, STANDBY, Collections.emptyList(), ""));
		}

		connection.sendMessage(new Message(RECORDER1, TV, REPORT_POWER_STATUS, Collections.emptyList(), ""));
	}
}
This concludes our implementation of the TV node. It’s now able to listen to other CEC-enabled devices, communicate with them and bridge this through MQTT messages. In part 2 we’ll take these MQTT messages, wrap them and create some scenes to turn everything on with a single button!
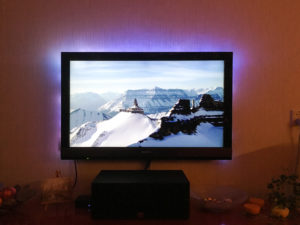 At first this seemed like an easy project as the basis was already created years ago by using an Arduino controlling the LEDs and a screen grabber installed on the connected Mac Mini. Since then I’ve switched to using an Apple TV instead and that means the grabber has to take place somewhere in between the AV receiver and TV. It was implemented using a Raspberry Pi running Hyperion and some hardware for grabbing the image (HDMI splitter, HDMI-to-RCA converter and a USB grabber). This all works pretty much out of the box, but often there was an annoying pink blink… Also every now and then the SD card got corrupt and had to be repaired. So far I’ve solved both issues and I’ll write a full blog post about it a bit later.


 In
In 
 Plex
Plex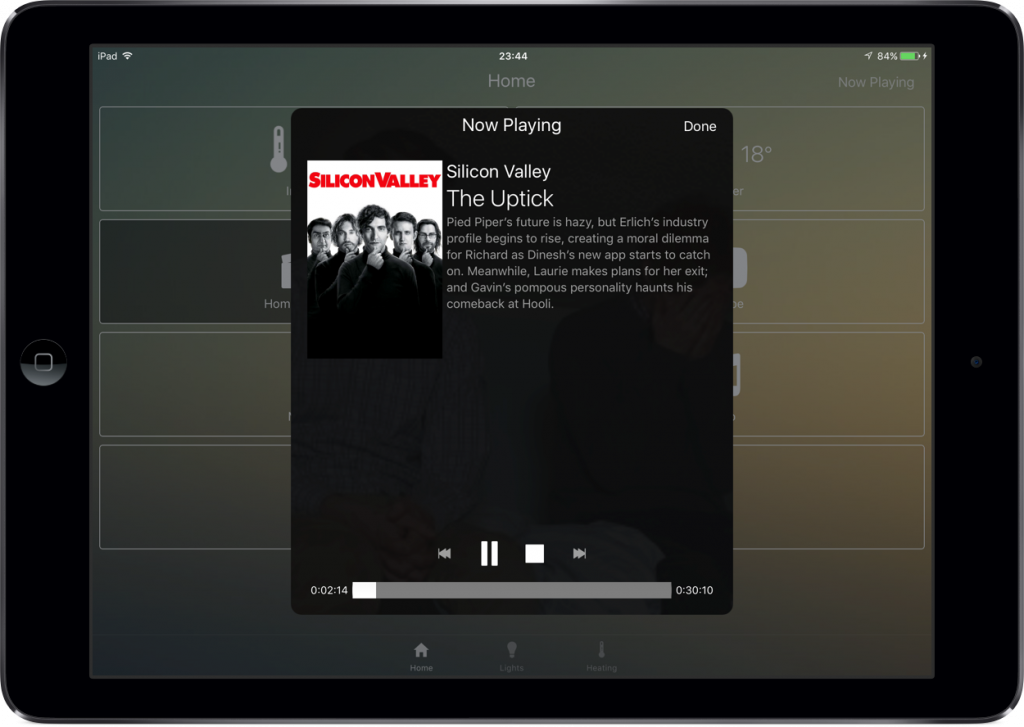
 Let’s start with the easiest device: the television. With the work we did yesterday in
 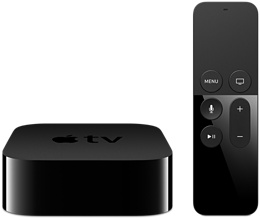 The Apple TV is a great device as the centre of the home theatre. It is able to control other devices through CEC, but unfortunately you can’t control it yourself through CEC. So I had to look for an alternative and I found it in AirPlay.
  My AV receiver is Denon AVR-X2000. CEC support on this device is limited, but luckily there is an API. Unfortunately, the API is not documented, but by using the web interface I could reverse engineer it. While it’s starting up there are some quirks though as it can take quite a while before the Denon is reachable through the API (while it already works by manually pressing the power button). Because of this we’ll use a combination of both CEC and the API.
 The NAS runs the Plex Media Server. When nobody is home, the NAS is not used and is turned off by default. The NAS supports Wake-on-LAN (WOL), so we can use this to awake it to make Plex available.